Wednesday, October 23, 2013

Colour Correction

In media we did about colour effects and controls in a video and how you can change the effects on a video. We did about the RGB on screens on electronic items such as televisions or laptops etc.. RBG stands for red green blue, the reason it is called red green blue is because every colour shown on a screen is made from at least one of theses colours. We also did about Luminance which is the light and dark on the screen. We also did Chrominance which is the strength of the colour. We did this on premiere pro by going to window > workspace > colour correction, it then comes up with two screens one has the video the other has the different colour corrections, then on the screen with the colour correction screen you click the panel menu and click either: YC waveform, Vector Scope, RGB Parade - and it brings up different methods of seeing the colour tone. We also learnt about Broadcast Safe which is the safety of the colours on the screen.


YC waveform:
This displays the Luminance and the Chrominance at the same time. 1.0 = pure white. 0.0 = pure black.


Vector Scope:
This displays the Chrominance. If it goes past the green by 75% it means that it is not Boradcast safe.


RGB Parade:
This displays the colour equality. It also shows the blend of colours and shows the chrominance by how much there is of each colour on the screen.


Here our three examples of adding themes to a particular part of the video I created:


This is a screenshot of the video in 'sepia'.


This is a screenshot of the video in 'colour negative'.


This is a screenshot of the video in 'bleach bypass 01'.

Point Break Sound


To do this video we took a clip from the film point break and then put it in premier pro and unlinked the sound then deleting it, and putting our own sound in using the music and sound given to us, we also downloaded our own sound from freesound.org. Once we finished doing our sound we had to Export the video we did via going: File > Export Setting, after that a window appears that has presets, file name, formats on etc. In this window we changed the format to 'H.264' and changed the preset to 'youtbe HD 1080p' (first youtube), We then had to change the name to 'Point break' so that it was clear to the audience. We then pressed the 'Export' button, and waited for the video to load exporting.

The project was to take the original sound off of the clip from point break and create our own sound to add to the clip, such as when the lady screams adding a scream sound that we either download or originally installed ourselves.

Before we made the video we also had to make a sequence ourselves. The way in which we did this was....


The final piece I believe sounds good because I like the timing which I got on the running and also the pattern that I added, for instance when the masked man is turning and skidding I added skidding and stuttered the footsteps to match the steps on screen, I also did the same when any character in the clip jumped. In the clip the main issue I did not like was the scream of the woman because I couldn't find a scream that suited well to the clip. For the hits that the woman did I recorded the sound from a sound recorder myself and put them in the clip, this was good, although I found it hard to get the hit timing right. The other issue I found was when the man throws the dog I found this hard because I again could not find a sound that suited.

Friday, October 18, 2013

Napoleon Dynamite Sequence


The challenge of this project was to watch a short clip from Napoleon given to us and then go and video the scenes in our groups exact as shown on the original clip but with ourselves instead, and then use premiere pro to make the shots that we did ourselves match up to the original clip from the film napoleon. Our challenge was mainly focusing on getting the sht types and also camera angles etc. and how to use continuity editing so that the whole video matched up and there were no errors.


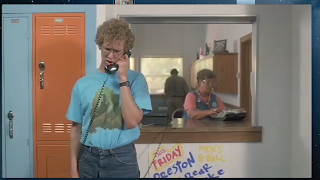
This is the original clip taken from the film.

We also had to make a storyboard on the videoing that we did ourselves in our group, we did this by watching the original clip through, and whenever a cut appeared in the original we paused it and drew the image in the storyboard. The reason we did this after every cut was so we could clearly see how the shot that we were taking would start and give us a clear idea on how the whole clip would turn out. I think that the timings that we took in drawing the Image in the storyboard after every cut was good, because when we were filming we straight away knew when we look at the storyboard what the shot would involve.

Filming process:
I think taht the filming process that we tok in our group went weel because we made sure that we all had a something to do and that we were all physically involved, we also made sure that we listened to each one of our ideas and tried it out to see which one would work best so that it stayed fair. As a team we worked well because we made sure that if we had ant obstacles we thought about how to overcome that obstacle for instance in one scene the shortest person in the group being me was the teacher and was suppose to appear the tallest of us all, so the other two characters (taller than me) went on their knees and moved on their knees so that in the shot they appeared shorter. The main problems that we faced when filming were acting errors, such as smiling when not required in the scene. I f we were to film again the main difference that I would do would be the set in as far as I would make sure that the set in each scene matched up better, aka flooring.
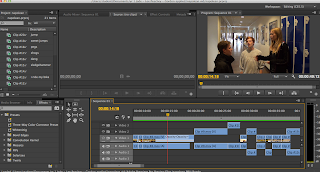


Screenshot or project working window.


Screenshot of project organisation.


1
 2
 3


4


 3


1
2


4


1) This shot is of Napoleon holding the phone at the beginning of the whole clip all together, the main difference in our shpt is in the original it has an extra character behind the desk where as we do not. Also the original has a lot more colours on the desk such as blue and orange where as we only hav one main colour which is white, In the original there are also more notices, where as we do not have any notices. We could have managed this and made it match up to the original more by respecting the setting in the original and avoiding mistakes such as not having a person behind the desk, also i believe we could have found somewhere more colourful.
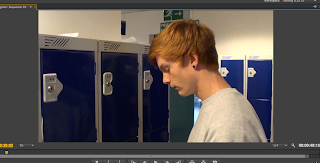
2) The difference in this shot is that we made Napoleon further away and obviously had a bigger height difference because they were on their knees, we could have avoided this by better casting. The other difference is the corridor behind our shot compared to the lockers in the original, and again the colours involved.
3) This shot is of the zoom art the end of the clip where Napoleon has just seen pedro do the jump, This video we had pretty much spot on the main problem we had was backing for in the original there is grass and in ours is a fence.
4)This shot is of Napoleon turning round from his locker when going to speak to pedro about doing the jump, once again the acting was well and matched the main error was backing, for in the original there were more colours.


Continuity Editing

Continuity editing involves many techniques within it such as the  180˚ rule, match-on-action and also the eye line match. It is a style for film making and also video editing in the post - production process of film making of narrative films and also television programs. It consists of four micro elements which are:
1) Editing
2) Mise - en - scene
3) Camerawork / Cinematography
4) Sound.
The purpose of continuity editing is to smooth over the original discontinuity of the editing process and also to show the logical coherence between shots. Logical coherence is usually achieved by cutting to continuity, which expresses the smooth transitions of the time and the space. Some films involve cutting to continuity in a more complex classical cutting technique, one which also tries to show physiological continuity of shots. The montage technique relies on symbolic association of ideas between shots rather than association of physical actions for its continuity.

180˚ rule:
In film making the 180˚ rule is a diagram showing the on - screen spatial relationship between one character and the other, or an object within the scene. It involves a line that covers 180˚, and on one side of the line (red side in image) is where the camera stands to film, and on the other side of the line (green side in image) is where the actors and space is filmed.


Match - on - action:
Match - on - action consists of two shots. In the first shot the character starts his action and in the second shot the character finishes the action. Generally the scene wont contain any distraction and will flow in an effective manner. There is a change in perspective in the camera as well.
example... first shot has a man throwing a ball then changes to the second shot of the man catching a ball.
 
eye line match:
This is based on the idea that the audience will want to see whatever it is that the character on screen is looking at during the close up only of the characters face on screen. I t begins with a shot of the characters face only on screen, then a cut happens, and then a shot of whatever it is that the character that was previously on screen was looking at.
example... first shot of a mans face looking towards the left, cut, second shot of the television. 
 

Sunday, October 13, 2013


Shaded drawings that I did at home, one is of a lion roaring at an angle, the other is of the book cover 'War Horse', I like these drawings because of the detail.

Friday, October 11, 2013

This is the shading that I did on Photoshop that took 2 weeks. I used did and outline, Sketch, Shading and also blending. The reason of which I like this photo is because I like the detail that is in it and also the way the different shades are all mixed together.
Dday with Mobas


What Mobas is:
Mobas is a business that helps other company's and businesses to sell their products via advertisements. They do designs, video adverts, post adverts, and social networking adverts, they also give the websites themselves ideas on how to help promote their business and does things to help them company's (advice). They bring up solution's and creative new ideas to the businesses and show the business what they need and want themselves.

10/10/2013:
Yesterday when Mobas came to visit the college i attend they did a presentation that told me what Mobas was and also how they helped other businesses in promotion and advertisements, and the process that they generally take. They also mention few company's that they have advertised for in the past such as 'The Greene King', 'DELUXE' and the 'NHS' and more. They also spoke about the job types that they have and all the different types of positions in that particular industry. They told us about the 5 main key questions they have to answer to get the right publishing, and how social media has a strong part in all businesses and what social media is etc.

What I got out of yesterday:
Yesterday i learnt how to work as a group in designing and how having particular roles per person can help in designing and ordering etc. I also learnt about presenting and the different possible ways you can take in presenting your ideas to an audience.

What could have been done to get more out of yesterday:
I believe that I could have got more out of yesterday if they had spoke more about getting into the actual business of media and design etc. and how you can get into particular positions in that industry of your choice.